Lecture 20: Monitoring ML experiement with MLFlow and Model deployment with streamlit#
Learning objectives#
By the end of this lecture, students should be able to:
Understand the purpose and components of MLflow.
Learn how to set up and use MLflow for experiment tracking.
Explore model management and deployment with MLflow.
See practical examples of using MLflow in a machine learning project.
Introduction#
MLflow is an open-source platform designed to manage the end-to-end machine learning lifecycle. It provides tools for experiment tracking, model management, and deployment, making it easier for data scientists and machine learning engineers to develop, track, and deploy machine learning models.

1. Purpose of MLflow#
Why MLflow?#
Machine learning projects often involve multiple stages, including data preprocessing, model training, hyperparameter tuning, and deployment. Managing these stages can be challenging, especially when working in a team. MLflow addresses these challenges by providing a unified platform to:
Track Experiments: Record and compare different runs of your machine learning experiments.
Manage Models: Store, version, and share machine learning models.
Deploy Models: Deploy models to various environments, including cloud services and edge devices.
2. Components of MLflow#
MLflow consists of four main components:
MLflow Tracking:
Allows you to log and query experiments.
Records parameters, metrics, and artifacts (e.g., model files, plots).
MLflow Projects:
Provides a standardized format for packaging data science code.
Facilitates reproducibility and sharing of projects.
MLflow Models:
Defines a standard format for packaging machine learning models.
Supports multiple flavors (e.g., Python function, TensorFlow, PyTorch).
MLflow Model Registry:
Centralized repository to manage model versions.
Supports model lifecycle management (e.g., staging, production).
3. Setting Up MLflow#
If you’re using vscode locally#
Install MLflow using pip:
# pip install mlflow
Starting the MLflow Tracking Server#
Start the MLflow tracking server to log and view experiments:
Open a terminal
Type
mflow ui
You should get an output along the line of
[2024-10-28 20:24:27 -0700] [88575] [INFO] Starting gunicorn 23.0.0
[2024-10-28 20:24:27 -0700] [88575] [INFO] Listening at: http://127.0.0.1:5000 (88575)
[2024-10-28 20:24:27 -0700] [88575] [INFO] Using worker: sync
[2024-10-28 20:24:27 -0700] [88576] [INFO] Booting worker with pid: 88576
[2024-10-28 20:24:27 -0700] [88577] [INFO] Booting worker with pid: 88577
[2024-10-28 20:24:28 -0700] [88578] [INFO] Booting worker with pid: 88578
[2024-10-28 20:24:28 -0700] [88579] [INFO] Booting worker with pid: 88579
This command starts the MLflow UI, accessible at http://127.0.0.1:5000.
Open a new web browser and paste in the mlflow ui link: http://127.0.0.1:5000
You should be able to see the mlflow tracking UI showing up now

4. Using MLflow for Experiment Tracking#
Example: Tracking a Simple Experiment#
Let’s first import a housing dataset
from sklearn.datasets import fetch_california_housing
from sklearn.ensemble import RandomForestRegressor
from sklearn.metrics import root_mean_squared_error
from sklearn.model_selection import train_test_split
import mlflow

# Load the California housing dataset
housing = fetch_california_housing(as_frame=True)
print(housing.DESCR)
.. _california_housing_dataset:

California Housing dataset
--------------------------

**Data Set Characteristics:**

:Number of Instances: 20640

:Number of Attributes: 8 numeric, predictive attributes and the target

:Attribute Information:
    - MedInc        median income in block group
    - HouseAge      median house age in block group
    - AveRooms      average number of rooms per household
    - AveBedrms     average number of bedrooms per household
    - Population    block group population
    - AveOccup      average number of household members
    - Latitude      block group latitude
    - Longitude     block group longitude

:Missing Attribute Values: None

This dataset was obtained from the StatLib repository.
https://www.dcc.fc.up.pt/~ltorgo/Regression/cal_housing.html

The target variable is the median house value for California districts,
expressed in hundreds of thousands of dollars ($100,000).

This dataset was derived from the 1990 U.S. census, using one row per census
block group. A block group is the smallest geographical unit for which the U.S.
Census Bureau publishes sample data (a block group typically has a population
of 600 to 3,000 people).

A household is a group of people residing within a home. Since the average
number of rooms and bedrooms in this dataset are provided per household, these
columns may take surprisingly large values for block groups with few households
and many empty houses, such as vacation resorts.

It can be downloaded/loaded using the
:func:`sklearn.datasets.fetch_california_housing` function.

.. rubric:: References

- Pace, R. Kelley and Ronald Barry, Sparse Spatial Autoregressions,
  Statistics and Probability Letters, 33 (1997) 291-297
# input data
housing.data
| MedInc | HouseAge | AveRooms | AveBedrms | Population | AveOccup | Latitude | Longitude | |
|---|---|---|---|---|---|---|---|---|
| 0 | 8.3252 | 41.0 | 6.984127 | 1.023810 | 322.0 | 2.555556 | 37.88 | -122.23 |
| 1 | 8.3014 | 21.0 | 6.238137 | 0.971880 | 2401.0 | 2.109842 | 37.86 | -122.22 |
| 2 | 7.2574 | 52.0 | 8.288136 | 1.073446 | 496.0 | 2.802260 | 37.85 | -122.24 |
| 3 | 5.6431 | 52.0 | 5.817352 | 1.073059 | 558.0 | 2.547945 | 37.85 | -122.25 |
| 4 | 3.8462 | 52.0 | 6.281853 | 1.081081 | 565.0 | 2.181467 | 37.85 | -122.25 |
| ... | ... | ... | ... | ... | ... | ... | ... | ... |
| 20635 | 1.5603 | 25.0 | 5.045455 | 1.133333 | 845.0 | 2.560606 | 39.48 | -121.09 |
| 20636 | 2.5568 | 18.0 | 6.114035 | 1.315789 | 356.0 | 3.122807 | 39.49 | -121.21 |
| 20637 | 1.7000 | 17.0 | 5.205543 | 1.120092 | 1007.0 | 2.325635 | 39.43 | -121.22 |
| 20638 | 1.8672 | 18.0 | 5.329513 | 1.171920 | 741.0 | 2.123209 | 39.43 | -121.32 |
| 20639 | 2.3886 | 16.0 | 5.254717 | 1.162264 | 1387.0 | 2.616981 | 39.37 | -121.24 |
20640 rows × 8 columns
# target column which is the median house value for California districts, expressed in hundreds of thousands of dollars ($100,000)
housing.target
0        4.526
1        3.585
2        3.521
3        3.413
4        3.422
         ...
20635    0.781
20636    0.771
20637    0.923
20638    0.847
20639    0.894
Name: MedHouseVal, Length: 20640, dtype: float64
We run a typical ML pipeline using linear regression
from sklearn.linear_model import LinearRegression

# Split the data into training and testing sets
X_train, X_test, y_train, y_test = train_test_split(housing.data, housing.target, test_size=0.2, random_state=42)

# Train the model
model = LinearRegression()
model.fit(X_train, y_train)

# Predict and evaluate
predictions = model.predict(X_test)
rmse = root_mean_squared_error(y_test, predictions)
print(f"RMSE: {rmse}")
RMSE: 0.7455813830127763
Set your mlflow ui
Before running the mflow code, you need to specify where the mlflow ui is by running
mlflow.set_tracking_uri(uri="http://127.0.0.1:5000")
autologging#
MLflow can automatically log training code written in many ML and deep learning frameworks. This is the easiest way to get started using MLflow tracking.
Okay, let’s see how can we use mlflow to keep track of our experiments
# Enable autolog()
# mlflow.sklearn.autolog() requires mlflow 1.11.0 or above.
mlflow.sklearn.autolog()

# With autolog() enabled, all model parameters, a model score, and the fitted model are automatically logged.
with mlflow.start_run():
    # Split the data into training and testing sets
    X_train, X_test, y_train, y_test = train_test_split(housing.data, housing.target, test_size=0.2, random_state=42)

    # Train the model
    model = LinearRegression()
    model.fit(X_train, y_train)

    # Predict and evaluate
    predictions = model.predict(X_test)
    rmse = root_mean_squared_error(y_test, predictions)
2024/10/29 09:51:14 INFO mlflow.tracking._tracking_service.client: 🏃 View run overjoyed-sheep-599 at: http://127.0.0.1:5000/#/experiments/0/runs/2344774fd4c7477099e0dc05a999f012.
2024/10/29 09:51:14 INFO mlflow.tracking._tracking_service.client: 🧪 View experiment at: http://127.0.0.1:5000/#/experiments/0.
By default, mlflow.sklearn.autolog will log all model parameters and model scores.
manual logging#
You can also manually log the model, model parameters, evaluation metrics, and other artifacts using mlflow.log_param(), mlflow.log_metric(), mlflow.log_model(), and mlflow.log_artifact(). These functions let you control exactly which parameters and metrics are logged, and also let you log other artifacts of the run such as tables and plots.
from numpy import savetxt
# Disable autolog
mlflow.sklearn.autolog(disable=True)

# Further code without autologging
with mlflow.start_run():
    # Split the data into training and testing sets
    X_train, X_test, y_train, y_test = train_test_split(housing.data, housing.target, test_size=0.2, random_state=42)

    # Train the model
    model = LinearRegression()
    model.fit(X_train, y_train)

    # Predict and evaluate
    predictions = model.predict(X_test)
    rmse = root_mean_squared_error(y_test, predictions)

    # Manually log parameters, metrics, and model
    mlflow.log_param("model_type", "LinearRegression")
    mlflow.log_metric("rmse", rmse)
    mlflow.sklearn.log_model(model, "model")

    # Save the table of predicted values
    savetxt('predictions.csv', predictions, delimiter=',')

    # Log the saved table as an artifact
    mlflow.log_artifact("predictions.csv")
2024/10/29 09:57:14 WARNING mlflow.models.model: Model logged without a signature and input example. Please set `input_example` parameter when logging the model to auto infer the model signature.
2024/10/29 09:57:14 INFO mlflow.tracking._tracking_service.client: 🏃 View run bald-slug-722 at: http://127.0.0.1:5000/#/experiments/0/runs/9fba11a4f4f64fe89c29cb65c3d7af17.
2024/10/29 09:57:14 INFO mlflow.tracking._tracking_service.client: 🧪 View experiment at: http://127.0.0.1:5000/#/experiments/0.
View Results in MLflow UI
Open the MLflow UI at http://127.0.0.1:5000 to view the logged experiment.
5. Model Management and Deployment with MLflow#
6. Practical Examples#
Example 1: Hyperparameter Tuning#
Track different hyperparameter configurations and their performance metrics.
# Enable MLflow autologging
mlflow.sklearn.autolog()
with mlflow.start_run():
    model = RandomForestRegressor(n_estimators=200, max_depth=10, random_state=42)
    model.fit(X_train, y_train)
    predictions = model.predict(X_test)
    rmse = root_mean_squared_error(y_test, predictions)

    mlflow.log_param("n_estimators", 200)
    mlflow.log_param("max_depth", 10)
    mlflow.log_param("model_type", "RandomForestRegressor")
    mlflow.log_metric("rmse", rmse)
    mlflow.sklearn.log_model(model, "model")
2024/10/29 10:00:04 WARNING mlflow.models.model: Model logged without a signature and input example. Please set `input_example` parameter when logging the model to auto infer the model signature.
2024/10/29 10:00:04 INFO mlflow.tracking._tracking_service.client: 🏃 View run rogue-foal-91 at: http://127.0.0.1:5000/#/experiments/0/runs/f61806c0449e4857a7019881fd9294c7.
2024/10/29 10:00:04 INFO mlflow.tracking._tracking_service.client: 🧪 View experiment at: http://127.0.0.1:5000/#/experiments/0.
Example 2: Logging Artifacts#
Log additional artifacts such as plots and data files.
import matplotlib.pyplot as plt
with mlflow.start_run():
model = RandomForestRegressor(n_estimators=100, random_state=42)
model.fit(X_train, y_train)
predictions = model.predict(X_test)
rmse = root_mean_squared_error(y_test, predictions)
mlflow.log_param("n_estimators", 100)
mlflow.log_metric("rmse", rmse)
mlflow.sklearn.log_model(model, "model")
mlflow.log_param("model_type", "RandomForestRegressor")
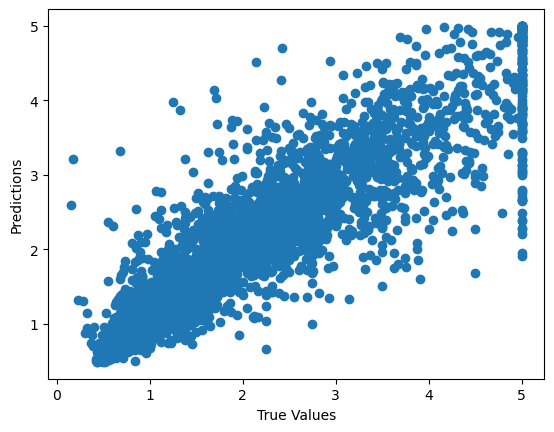
# Log a plot
plt.scatter(y_test, predictions)
plt.xlabel("True Values")
plt.ylabel("Predictions")
plt.savefig("scatter_plot.png")
mlflow.log_artifact("scatter_plot.png")
2024/10/29 10:06:40 WARNING mlflow.models.model: Model logged without a signature and input example. Please set `input_example` parameter when logging the model to auto infer the model signature.
2024/10/29 10:06:40 INFO mlflow.tracking._tracking_service.client: 🏃 View run flawless-gnat-386 at: http://127.0.0.1:5000/#/experiments/0/runs/855834f31a20438ab8f998fdc6dc7c7d.
2024/10/29 10:06:40 INFO mlflow.tracking._tracking_service.client: 🧪 View experiment at: http://127.0.0.1:5000/#/experiments/0.
Example 3: Running multiple models#
# Define the models
models = {
    "LinearRegression": LinearRegression(),
    "RandomForestRegressor": RandomForestRegressor(n_estimators=100, random_state=42),
    "KNeighborsRegressor": KNeighborsRegressor(n_neighbors=5)
}
from sklearn.linear_model import LinearRegression
from sklearn.ensemble import RandomForestRegressor
from sklearn.neighbors import KNeighborsRegressor

mlflow.sklearn.autolog()

# Train and log each model
for model_name, model in models.items():
    with mlflow.start_run(run_name=model_name):
        # Train the model
        model.fit(X_train, y_train)

        # Predict and evaluate
        predictions = model.predict(X_test)
        rmse = root_mean_squared_error(y_test, predictions)

        # Log parameters, metrics, and model
        # mlflow.log_param("model_type", model_name)
        # mlflow.log_metric("rmse", rmse)
        # mlflow.sklearn.log_model(model, "model")

        # print(f"{model_name} - RMSE: {rmse}")
2024/10/29 10:03:35 INFO mlflow.tracking._tracking_service.client: 🏃 View run LinearRegression at: http://127.0.0.1:5000/#/experiments/0/runs/f3c56cf61be440b0819890ec88558b98.
2024/10/29 10:03:35 INFO mlflow.tracking._tracking_service.client: 🧪 View experiment at: http://127.0.0.1:5000/#/experiments/0.
2024/10/29 10:03:46 INFO mlflow.tracking._tracking_service.client: 🏃 View run RandomForestRegressor at: http://127.0.0.1:5000/#/experiments/0/runs/0270a42fcf944cd8b8bcdd18d1773354.
2024/10/29 10:03:46 INFO mlflow.tracking._tracking_service.client: 🧪 View experiment at: http://127.0.0.1:5000/#/experiments/0.
2024/10/29 10:03:48 INFO mlflow.tracking._tracking_service.client: 🏃 View run KNeighborsRegressor at: http://127.0.0.1:5000/#/experiments/0/runs/64925094ac02446a9e046328b3efcbba.
2024/10/29 10:03:48 INFO mlflow.tracking._tracking_service.client: 🧪 View experiment at: http://127.0.0.1:5000/#/experiments/0.
Conclusion#
MLflow is a powerful platform for managing the machine learning lifecycle. It provides tools for experiment tracking, model management, and deployment, making it easier to develop, track, and deploy machine learning models. By integrating MLflow into your workflow, you can improve reproducibility, collaboration, and efficiency in your machine learning projects.
References#
Model deployment with streamlit#
Learning objectives:#
Learn how to track, package, and manage machine learning models using MLflow.
Understand how to create and deploy interactive web interfaces for model inference using Streamlit.
Learn how to integrate
MLflowmodels intoStreamlitapplications and deploy them to local production environments.
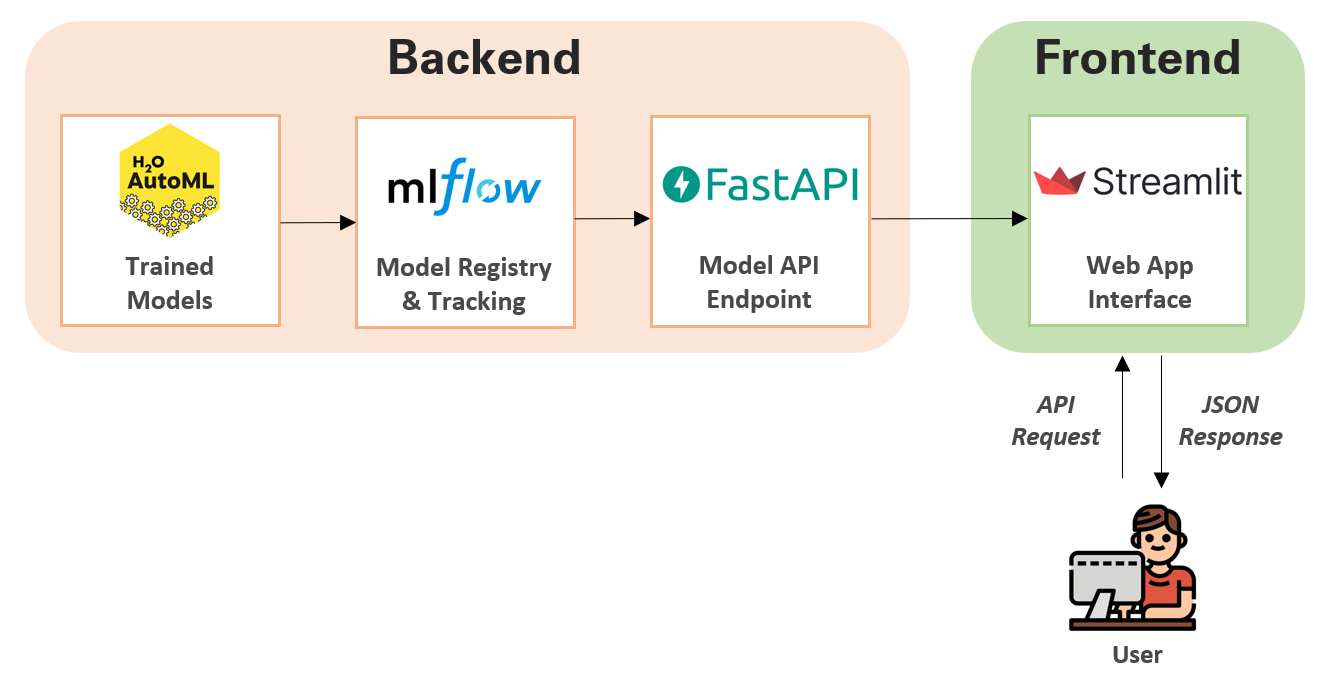
1. Introduction#
After training your machine learning model and ensuring its performance, the next step is deploying it to a production environment. This process can be complex, but MLflow simplifies it by offering an easy toolset for deploying your ML models to various targets, including local environments, cloud services, and Kubernetes clusters.

In today’s example, we will use mlflow to deploy our model locally and use streamlit as the front end
MLflow: An open-source platform to manage the ML lifecycle, including experimentation, reproducibility, and deployment.
Streamlit: An open-source app framework for Machine Learning and Data Science teams to create beautiful, performant apps.
2. Steps to Deploy a Model#
Train a Model: Train a simple classification model on the Iris dataset.
Log the Model with MLflow: Use MLflow to log the model.
Deploy the Model: Deploy the model using MLflow’s model serving capabilities.
Create a Streamlit App: Build a Streamlit app to interact with the deployed model.
3. Implementation#
Step 1: Start mlflow tracking server#
In terminal, run:
mlflow ui
Step 2: Train a Model#
# train.py
import mlflow
import mlflow.sklearn
from sklearn.datasets import load_iris
from sklearn.model_selection import train_test_split
from sklearn.neighbors import KNeighborsClassifier
from sklearn.metrics import accuracy_score
import pandas as pd

mlflow.set_tracking_uri(uri="http://127.0.0.1:5000")

# Load Iris dataset
iris = load_iris()
X = pd.DataFrame(iris.data, columns=iris.feature_names)
y = iris.target

# Split data
X_train, X_test, y_train, y_test = train_test_split(X, y, test_size=0.3, random_state=42)

# Start MLflow run
with mlflow.start_run() as run:
    # Train model with K=10
    knn = KNeighborsClassifier(n_neighbors=10)
    knn.fit(X_train, y_train)

    # Log model
    mlflow.sklearn.log_model(knn, "knn_model")
    accuracy = accuracy_score(y_test, knn.predict(X_test))
    mlflow.log_metric("accuracy", accuracy)

    print(f"Model logged with accuracy: {accuracy}")
2024/10/31 00:44:15 WARNING mlflow.models.model: Model logged without a signature and input example. Please set `input_example` parameter when logging the model to auto infer the model signature.
2024/10/31 00:44:15 INFO mlflow.tracking._tracking_service.client: 🏃 View run able-bass-627 at: http://127.0.0.1:5000/#/experiments/0/runs/b38184f4f350467fabb66aca3e1f2263.
2024/10/31 00:44:15 INFO mlflow.tracking._tracking_service.client: 🧪 View experiment at: http://127.0.0.1:5000/#/experiments/0.
Model logged with accuracy: 1.0
Step 3: Deploy the Model#
In terminal, run:
MLFLOW_TRACKING_URI=http://127.0.0.1:5000 mlflow models serve -m "runs:/<run_id>/knn_model" -p 5001
Replace <run_id> with the actual run ID from MLflow UI
Note: If you run into an error like this
mlflow.exceptions.MlflowException: Could not find the pyenv binary. See https://github.com/pyenv/pyenv#installation for installation instructions.
Then please run this in the terminal first:
PATH=”\(HOME/.pyenv/bin:\)PATH”
Then run the following command and replace <run_id> with the actual run ID from MLflow UI
MLFLOW_TRACKING_URI=http://127.0.0.1:5000 mlflow models serve -m “runs:/<run_id>/knn_model” -p 5001
Python Example#
import requests
import pandas as pd

# Define the URL of the deployed model
url = 'http://127.0.0.1:5001/invocations'

# Define the input data
input_data = pd.DataFrame({
    "sepal length (cm)": [5.1],
    "sepal width (cm)": [3.5],
    "petal length (cm)": [1.4],
    "petal width (cm)": [0.2]
})

# Convert the input data to the required format
data = {"dataframe_records": input_data.to_dict(orient='records')}

# Send the request to the model server
response = requests.post(url, json=data)

# Print the response
print("Response status code:", response.status_code)
print("Response JSON:", response.json())
Step 4: Create a Streamlit App#
Do a pip install streamlit if this is your first time using it
# app.py

import streamlit as st
import pandas as pd
import requests
from sklearn.datasets import load_iris

# Define the URL of the deployed model
url = 'http://127.0.0.1:5001/invocations'

# Load the Iris dataset
iris = load_iris()
iris_data = pd.DataFrame(data=iris.data, columns=iris.feature_names)
iris_data['species'] = pd.Categorical.from_codes(iris.target, iris.target_names)

# Streamlit app
st.title('Iris Classification')

st.write("This app predicts the Iris species based on user input features.")

# # Display the training data
# st.write("### Training Data")
# st.dataframe(iris_data)

# st.write("### Enter the Iris features")

# User input for Iris features
sepal_length = st.slider("Sepal Length (cm)", min_value=0.0, max_value=10.0, step=0.1)
sepal_width = st.slider("Sepal Width (cm)", min_value=0.0, max_value=10.0, step=0.1)
petal_length = st.slider("Petal Length (cm)", min_value=0.0, max_value=10.0, step=0.1)
petal_width = st.slider("Petal Width (cm)", min_value=0.0, max_value=10.0, step=0.1)

# Prediction
input_data = pd.DataFrame({
    "sepal length (cm)": [sepal_length],
    "sepal width (cm)": [sepal_width],
    "petal length (cm)": [petal_length],
    "petal width (cm)": [petal_width]
})

if st.button("Predict"):
    # Convert the input data to the required format
    data = {"dataframe_records": input_data.to_dict(orient='records')}

    # Make a prediction
    response = requests.post(url, json=data)

    if response.status_code == 200:
        prediction = response.json()
        predicted_class = iris.target_names[prediction['predictions'][0]]
        st.write(f"Predicted Iris Species: {predicted_class}")

        # Fetch and display an image of the predicted flower
        image_urls = {
            "setosa": "https://upload.wikimedia.org/wikipedia/commons/a/a7/Irissetosa1.jpg",
            "versicolor": "https://upload.wikimedia.org/wikipedia/commons/2/27/Blue_Flag%2C_Ottawa.jpg",
            "virginica": "https://upload.wikimedia.org/wikipedia/commons/thumb/f/f8/Iris_virginica_2.jpg/1200px-Iris_virginica_2.jpg"
        }

        image_url = image_urls.get(predicted_class, "")
        if image_url:
            st.image(image_url, caption=f"{predicted_class} Flower", width=250)
        else:
            st.write("Image not available for the predicted class.")
    else:
        st.write(f"Error: {response.status_code}")
4. Running the Application#
Train and Log the Model:
python train.pyServe the Model:
mlflow models serve -m runs:/<run_id>/iris_rf_model -p 5001
Run the Streamlit App:
streamlit run app.py
5. Conclusion#
MLflow helps in managing the ML lifecycle.
Streamlit provides an easy way to create interactive web applications for ML models.
Combining both tools allows for efficient model deployment and user interaction.